Turbolock installation is an easy task if you can perform it carefully. In this section, we have described the installation process you can follow to install your turbo lock.
Yet, you should remember turbo locks offer a range of electronic and mechanical locks. So the installation process would vary depending on the specific product you are using.
Here I will describe the installation part of turbolock. You can get the troubleshooting part from turbolock troubleshooting post
Yet, before you get started, take a look at some essential instruments you need to install the lock.
Turbolock manual with easy hacks
When it comes to securing your home or office, door locks play a crucial role in keeping unwanted visitors out. Electronic locks, such as Turbolock, offer a convenient and effective solution for those seeking a modern and efficient way to lock their doors.
What materials do you need?
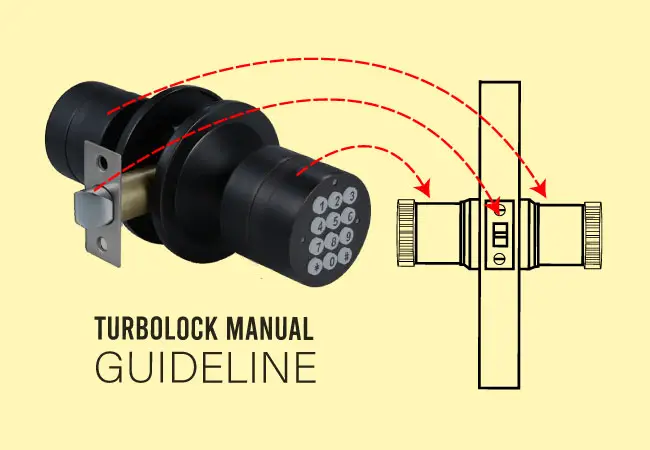
The instrument in the image below is included in the box. These are

- Turbolock YL-99 digital Smart keypad lock
- Phillips head screwdriver
- Two (2) AA batteries
- User manual (included with Lock).
- Backup mechanical key (included with lock)
Here are the installation instructions for the Turbolock YL-99. Follow the detailed step-by-step guide:
Step 1: Remove the old door lock
If you have an existing lock on your door, you need to remove the knob and other parts before installing the turbo lock. To do this,
Take a Phillips screwdriver, and remove the screws which hold the lock in place. Then you may easily take the Lock off your door.
Step 2: Check the door measurement
Anyway, you should double-check the measurement of your door before installing your lock to ensure compatibility.
- Measure if the door thickness is between 1 ⅜ inch and 1 ¾ inch(35 mm or 45 mm).
- Ensure the backset of the door and lock is either 2 ⅜ inch or 2 ¾ inch(60 mm or 70 mm).
- Confirm the door hole of the edge is 1 inch(25 mm).
Step 3: Mark your door

Step 4: Drill the hole in the door

If required, adjust the measurement or drill the door hole for your new door lock. To do this,
- Bore is a 2-inch diameter hole on your door face. Now drill at least 1 inch or 25 mm hole in the door edge to intersect with the 2-inch diameter hole center.
Mark holes on both sides of your door according to the backset requirement( 60 or 70mm). Now, mark the latch hole on the edge of your door.
Step 5: Install the latch bolt
- Place the latch bolt into the door hole. Then mark around the edge of the latch plate. Take out the latch bolt.

- Now chisel approximately 0.1 inches deep in a rectangular shape until the latch plate sits flush with the door edge while opening or closing your door.

- Insert the latch bolt. Then secure the latch bolt with the provided two screws.
Step 6: Install the strike plate
Now insert the strike plate and secure it with provided screws to fix it to the door frame.

Step 6: Install the outside knob
Now the power cable run through the latch hole.
Step 7: Install the interior knob
Now it’s time to attach the interior knob to the door. To do it, feed the power cable run through the knob hole and guide the spindle into the handle.
Secure the inside knob to the exterior knob with the provided mounting screws.

Step 8: Install the battery box
Insert 4 AAA batteries into the battery compartment. Place it into the battery box.
Set the power cable into the battery box and place it in sequence with the outside screw holes.

Step 9: Install the interior cover plate
- Place the cover plate over the battery pack and align it with the screw holes.
- Secure the cover plate to the interior knob with the fastening screws.
Step 10: Test the lock
Test the lock by entering default master code’0123’. The lock will beep, and you will notice the sound with a green flash. It indicates the installation is successful.

Now turn the knob to unlock the door and check if the unlocking is normal.