
Last updated on January 16th, 2024 at 11:09 pm
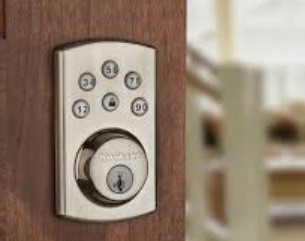
Installing a new Powerbolt 2 door lock can seem like a daunting task, but with the manual installation explanation it is a breeze.
In this guide, we’ll walk you through the step-by-step process of installing the Kwikset Powerbolt 2 and provide some tips to help you get the job done quickly and efficiently.
Before we get started, it’s important to note that the Kwikset Powerbolt 2 is designed for standard door preparation. If your door has a non-standard preparation, you may need to purchase a separate kit to properly install the lock.
kwikset powerbolt 2 installation instructions step by step processes
Here is the complete guide and instructions on how to install the Kwikset Powerbolt 2 touchpad keyless entry.
But first, let’s get some instruments you need to follow to install the lock.
You will need a Philips screwdriver, 4 AA batteries, and a ruler.
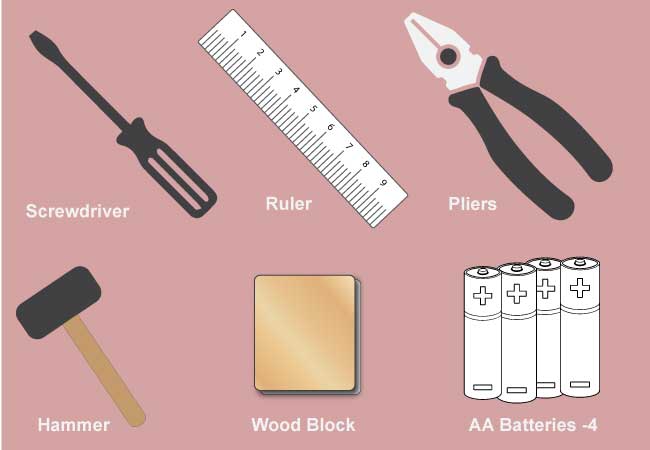
Depending on your door condition and application, you may also require a hammer, woodblock, and pliers.
Step 1: Prepare and check the dimensions

- Before installing the Kwikset Powerbolt 2 deadbolt, ensure the door should have the following specifications.
- Make sure the hole in the door is either 2-⅛ or 1-½(54 mm or 38 mm) inches wide.
- Measure to confirm that the door backset is either 2-⅜” or 2-¾”(60 mm or 70 mm) wide.
- Confirm the gap in your door edge is 1 inch(25 mm).
- Measure to ensure the door thickness is either 1-⅜ or 1-¾ inch (35 mm 0r 44 mm).

If your door does not control these dimensions, you will not be able to install the Kwikset Powerbolt 2 lock in the door, or you may need to do some drilling on the door.
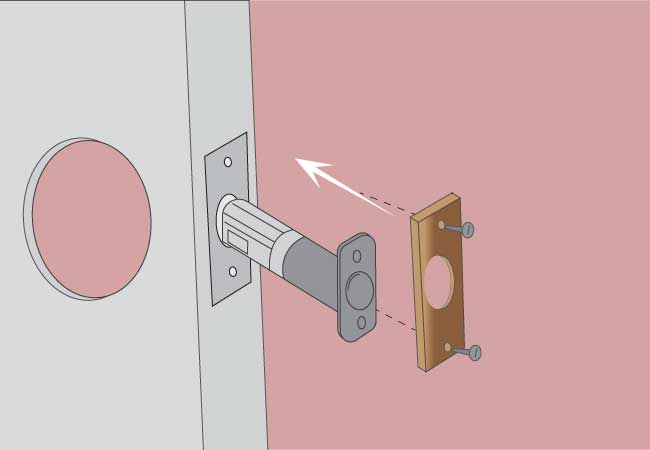
Step 2: Install the latch and strike
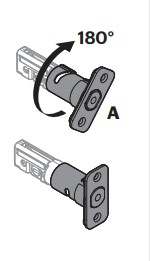
Keep the latch in front of the door hole, then flush against the door edge with the latch face.
Check if the slotted hole is centered on your door hole.
If it is centered in the door hole, there is no need to adjust.
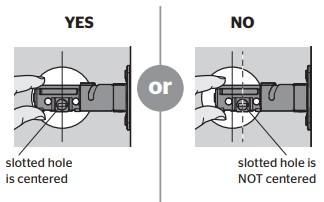
If the door hole is not centered, adjust the latch backset. To do it, you can rotate the latch face to extend the latch.
Check if the door edge is chiseled. If yes, take the supplied screws to install the latch.
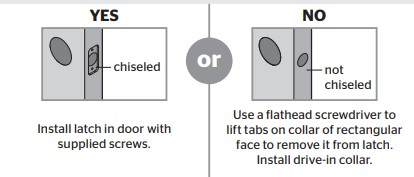
Ensure the slotted or cross-shaped hole is at the bottom of the latch.
Install the latch in the door with a wood block and hummer. Then secure it with the provided screws.
If the door doesn’t have a chiseled pocket, remove the rectangular face from the latch using a flathead screwdriver. Now install the drive-in collar to know furthermore read how to open a lock using screwdriver.
Align the two holes in the collar with the tabs on the latch.
Pull on the collar to confirm the tight fit and that it is securely installed.
Use a hammer and wood block to install the latch in the door.

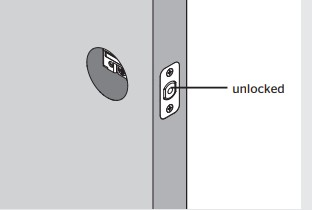
- Ensure the retraction is full of the latch when it is in the unlocked position.
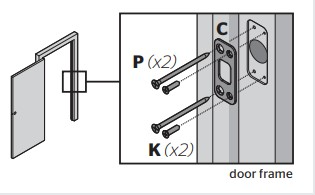
- Install the strike on your door frame with the help of supplied screws.
Note: Confirm the hole in the door frame is drilled a minimum of 1 inch ( 25 mm) deep.
Step 3: Adjust hardware and prepare the keypad and mounting plate (only for doors which has smaller holes)
- Check the diameter of the door hole.
- If the door hole measurement is 2-⅛ inch(54 mm), you can skip this step – 3
- But when the hole in the door is 1-½ inch (38 mm), adjust the mounting plate and the keypad assembly. To do this:
- Remove the two tabs from the mounting plate by using pliers.
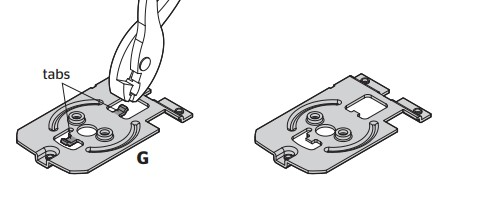
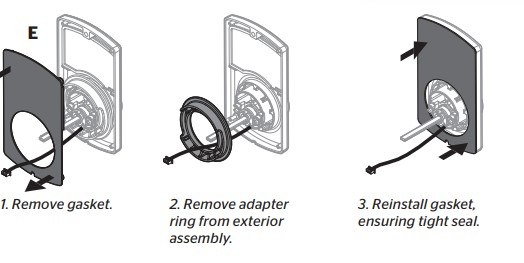
- Extract the gasket from the keypad assembly’s back side.
- From the gasket, extract the adapter ring.
- Re-install the gasket, and confirm a tight seal.
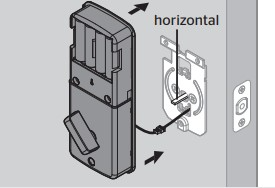
Step 4: Install exterior assembly
Now it’s time to install the exterior assembly. To do it, follow the below instructions:
- Feed the cable under the door latch.
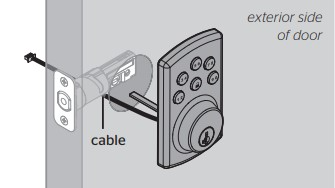
- Ensure the latch is completely retracted.
If you fall in any trouble with it read this: Door lock won’t retracting
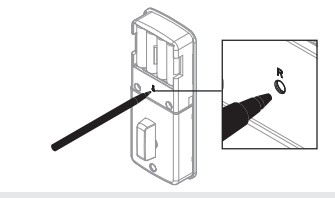
- Keep the torque blade in the horizontal stage.
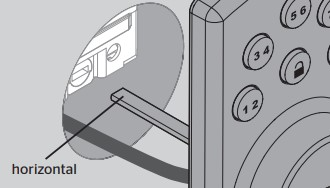
- Feed the torque blade in the latch through the horizontal slot.
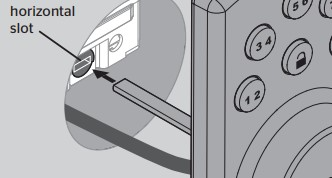
- Press the torque blade through the mounting plate’s center hole and feed it through the bottom hole.
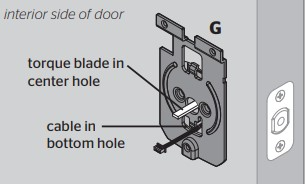
- Secure the mounting plate by using the supplied screws.

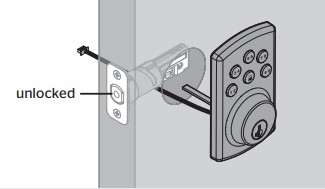
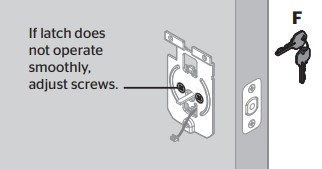
- Place the key and test the latch for a smooth procedure.
- Remove the key. Then keep the latch bolt still in the unlocked position when finished.
Step 5: Install the interior assembly
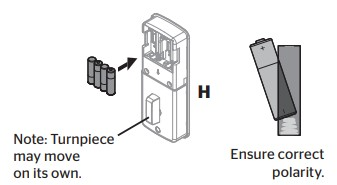
- From the inner assemblage, remove the battery cover.
- Install 4 AA batteries correctly into the inner assembly. To get the best result, use only the new and non-rechargeable batteries.
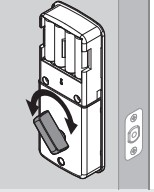
- The turn piece may rotate on its own after the installation of the batteries.
- Make sure the polarity is correct.
- Push and hold the Reset button on the inner assembly for five seconds until you listen to 3 beeps.
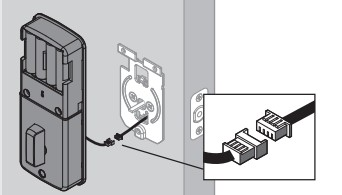
- Locate the colored edges of the connectors and align them. Then confirm a secure cable connection.
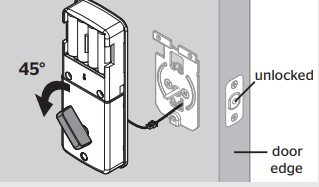
- Turn the turnpiece away from your door edge. Then ensure the latch is completely retracted when it is in the unlocked position.
- Confirm the torque blade is still in the horizontal stage. Now install the interior assembly.
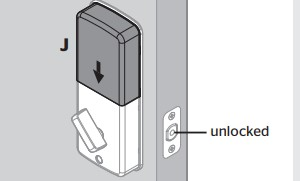
- Push the inner assembly onto the mounting plate.
- Ensure the turnpiece rotates smoothly.
- If it doesn’t turn or rotate, ensure the torque blade is in the horizontal position. Even ensure that the turnpiece is rotated away from the door edge.
- Secure the inner assembly with three mounting screws.
- Re-install the battery cover. Ensure the latch is still in the unlocked position and the door is open.
Step 6: Set locking and unlocking direction
- When the door is open and unlocked, enter the following code to guide the door lock to the door’s orientation.
- Press 0000( it is the default master code).
- Press the lock button. You will listen to one beep.
- Press 0.
- Re-press the lock button. If successful, you will listen to two beeps with green flashes. If unsuccessful, you will hear three beeps with a red blink. In that case, confirm the door is open and unlocked and that you are operating a fresh set of alkaline batteries. Repeat step 6.
- If successful, press the lock button again. The latch bolt will extend to the lock.
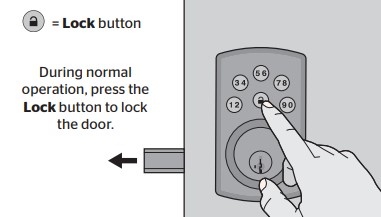
- Press the default user code(1-2-3-4). Then push the lock button. The door will successfully unlock.

- You have successfully installed your Kwikset Powerbolt 2.
Yet it is suggested that you replace or delete the default master code and user codes with your own code.