
Last updated on May 24th, 2023 at 04:23 am
Kwikset Smart lock 916 is a highly advanced electronic deadbolt compatible with the z-wave Smart home system. It offers both security and convenience to homeowners.
It is ideal for the front doors, garage entry doors, and any other entry point to your home. Even if you don’t want to remember your code, you can use the keyed exterior to open your door.
Some standard features make it popular to the user:
- It is easy to install, program, and even use.
- It has the SmartKey™ security system. It allows the lock to easily re-key Kwikset deadbolt.
SmartCode 916 is compatible with Smart home systems. So it can be integrated with popular Smart home platforms.
Such as Google Assistant, Amazon Alexa, and Apple HomeKit. This feature allows you to control your lock with your voice or through an app on your smartphone.
Kwikset 916 manual Guideline
Through the manufacturer of the lock, you may get the manual. From this manual, you will get the installation, programming, use, and other instructions.
Anyway, this installation process is easy to perform. Check the manual beside follow our instructions below to install your Kwikset SmartCode 916 electronic deadbolt.
What tools will you need to install a Kwikset 916 deadbolt?
Before starting the installation process, let’s see what tools we need. The Kwikset SmartCode 916 is relatively easy to install and requires only a few tools. Such as
- Ruler
- Phillips head screwdriver

If you have a hardwood floor, you may need to collect the below instrument owing to any scratches. You may use them under the door as a protector. These are:
- Hammar
- Woodblock.

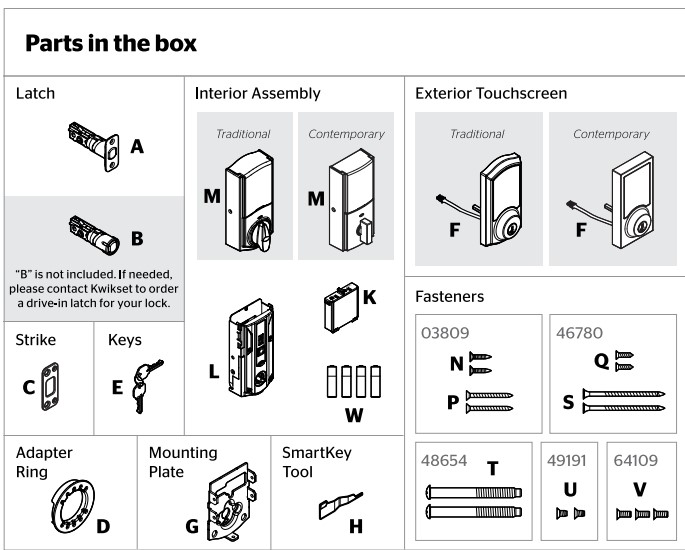
Anyway, let’s see some essential parts we will get in the box:
How to install Kwikset SmartCode 916 deadbolt?
Before you start, read the installation instructions through your Smart Lock. If you are drilling a new door, follow the provided template.
Step 1: Prepare and check the door measurements
Remove the old deadbolt:
If you already have an old deadbolt, remove it using a Phillips screwdriver.
Then, you may prepare the door. To do it, check if you have enough space in your door jamb for installation.
Place the exterior keypad and mounting plate on the outside door frame to interact with the inner assembly.
Then, you should measure the door from side to side or top to bottom of the door.
- Measure to ensure the door hole is either 2-⅛ inches or 1-½ inches (54 mm or 38 mm).
- Measure to confirm the backset is either 2-⅜ (60 mm) or 2-¾ inch ( 70 mm).
- Measure to ensure the door edge hole is 1″ (25 mm).
- Measure to ensure the door thickness is between 1-⅜ inch (35 mm) and 2 inches ( 51 mm).

Step 2: Install the latch and strike
- Check if the door edge is chiseled. Use the A latch when it is chiseled. If the door latch bolt is not extended already, open it as shown.
But when the latch bolt won’t be chiseled, use latch B( not included).


- Grab the latch bolt in front of the door hole, with the latch face flashing against the door edge.

- Now insert the latch and strike it on the edge of the door frame. Then secure the screws with a screw gun or a drill driver.

Step 3: Install the exterior touchscreen
Install the touchscreen keypad and mounting plate. Follow the instructions from the image below and complete these steps.

Insert the key, then test the latch. If the latch doesn’t extend or retract fairly, adjust the provided screws.
Remove the key after it is finished, and ensure the latch bolt is completely extended.
Related post: Why my Kwikset door latch won’t retract
Step 4: Install the interior assembly
- Take out the internal battery cover and battery pack from the interior of the Kwikset Lock.

- Connect the cable and confirm it is tight.

- Now install the internal assembly onto the provided mounting plate, and secure it.
To know more you can read Kwikset battery replacement where I told the installation part elaborately too!
Step 5: Install batteries and perform door handing process
Install the batteries:
- Insert 4 AA non-rechargeable batteries in the battery pack.

- Keep your door open. Install the battery pack into the battery compartment of the internal assembly. Then slide the cover to insert it in.

Perform the door-handing process:
After installing the battery pack, the door will begin to extend and retract to observe the door’s orientation.
It is known as the door-handing process. It is crucial to function the Kwikset lock perfectly.

If the door-handing is unsuccessful, the LED indicates the failure. In that case, confirm the batteries are correctly inserted, and the cables are well connected. To know more read this post: Kwikset lock is not working after battery replacement.
If still the process is unsuccessful after taking the second attempt, retake the manual door-handing procedure.
Step 6: Pair the Kwikset Lock to the Smart home system
Now, you need to add your Locks to the Smart home system. In that case, follow the instructions from the below image to add it to your Smart home system.

If the process is successful, rename this lock in your Smart Home System.
If unsuccessful, follow the system instructions and remove the lock and any network from the controller.
Then perform the above step again.
Step 7: Add the user codes(30max)
You can add all the codes through your Smart home system. If the System doesn’t allow this, these codes may be paired directly to your lock.
- Confirm your door is open.
- Click on the program button.

- Click on the checkmark icon once.

- Type your desired user code. It would be a total code of 30.
- Click on the lock button a single time.

- If you notice the check mark symbol with one beep, the programming is successful.

- If you notice the ‘X’ pattern with three beeps, programming is unsuccessful.

Step 8: Test the lock
- Touch the screen with your palm or the back of your hands to wake it.

- Now click on the lock button to test the locking of your door.

- To unlock the door, touch the random code appearing if it is SecurityScreen enabled. Then type the user code to test the unlocking of the door.

Step 9: Installing the interior cover
Before installing the interior cover on your Kwikset lock, get some information about the interior cover of the Kwikset SmartCode:
The interior cover’s window is locked by default. It prevents somebody from tampering with the lock’s settings.

Remove the security screws to unlock the cover’s window. It will allow easy access to the battery pack.

Now slide up the window to remove. Then you will get access to the programming button and the battery pack.

Let’s jump to the cover installation process:
Install the interior cover.

Note: In that case, you may need to align the turnpiece shaft with the turnpiece by rotating the turnpiece.
Install the security screws.

Thus, the installation of the Kwikset SmartCode 916 deadbolt is successfully completed.
In conclusion
I hope this article has offered you better knowledge about the Kwikset SmartCode 916 deadbolt with z-wave technology. You may now easily perform the installation or programming of the Kwikset Lock and use it freely.
Yet, if you face any trouble doing this act, it is best to contact professionals to get better help. Don’t hesitate to share your pain with us.